MGF power hood bracket improvement. PDF
The bracket that gets attached to the original hood frame to provide the pick-up point for the hydraulic actuators, is a flat soft metal strip of 4 mm gauge.
The ball joint link for the actuators stands out some 20 mm from this bracket. If we assume that the actuators have a working piston surface of at least 4 cm2 and a working pressure of at least 25 bar, they will be pulling with at least 100 kg or 1000 N on this pick-up. The twisting moment is then in the order of 20 Nm. These are most probably very conservative figures. When watching the hood being closed by these actuators, it is frightening to see how these brackets flex and twist. If there happens to be any stiffness in getting the hood moving, the brackets bend, then twist and finally the actuators pull of the ball joints. This has happened to me several times. The brackets are easy to straighten, but it definitely takes less than 20 Nm. As this is annoying to say the least and I feared permanent damage, I decided to reinforce the brackets. This is what I did.
Caution: The hardtop brackets can not be used anymore with this mod.
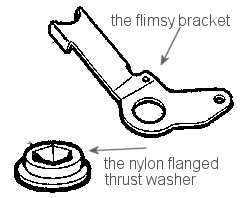
After taking the brackets off, put/hammer them back to their original shape, especially around the pivoting hole. I attached the pick-up link with a plain M8 nut, with the sides parallel to the sides of the bracket. I took some steel strip of 4 mm gauge, 15 mm wide and cut two pieces of 12, respectively 7.5 cm. Bend the longer strip to follow the shape of the bracket and grind off material at the top end to match the curve of the bracket. See drawing. You have to cut several slots in the longer strip: One for the nylon thrust washer and one for the U-shaped clamp that holds the bracket to the hood stacks. Make the last one wide enough, say 2 mm wider than the clamp, as fitting the U-clamp is now more difficult. As I use the original lock-nut on top of the plain M8 nut, material has to be cut away to make this possible. Offer these strips up against the flats of the M8 nut as shown. After cleaning the paint off the bracket, I then MIG welded the strips and the nut to the bracket on the outside. Be careful not to weld too close to the slots. You now have created a sort of open box section that should be sufficiently stiff against twisting. After cleaning and painting it can now be refitted. It will be necessary to cut even more off the foam rear bulkhead trim panel. This is an untidy necessity, but there is no choice. With some ingenuity the plastic covers can be refitted to hide the actuating mechanism, but they are pretty useless and anyhow, they will prevent to really enjoy the new-found stability of the brackets you modified.
Good luck.
January 3, 2002, Ton Maathuis