|
MGF/TF
Rear Wheel Bearing -
A Rough Guide (K.Jackson 10/10/02) , enhanced by Dieter, including hints
from Stefan B. (Lotus Elise) |
|
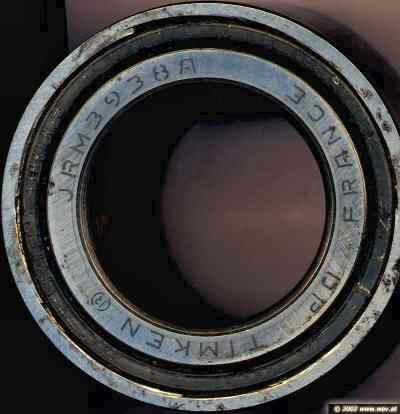
Parts
required Wheel
bearing / Radlager / Timken JRM 3938A Timken
JRM3938A http://www.technostart.co.uk/ (bearing Kit cross reference) identical
bearings are / Baugleich i.S. Radlager sind: |
 |
|
Tools
required Jack up rear of car, leaving handbrake ON. Chock the front & rear wheels on the side opposite the one you're working on. Lower onto axle stand or sizeable block of wood. Remove wheel. Using
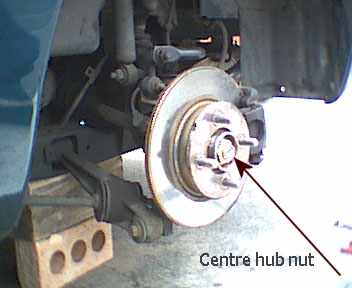
Torque wrench and 1 ¼" socket slacken centre hub nut.
The nut will have been punched into the keyway on the driveshaft,
so using the punch, try to open it back out before undoing centre
nut. It will be VERY tight! |
|
|
|
|
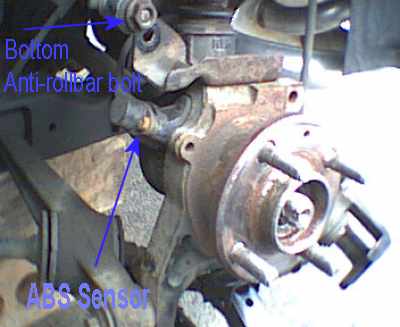
| Once the hub nut has been removed, release the handbrake, and remove the calliper, brake pads and then the calliper mounting bracket. Remove brake disc. This might be quite tight if it's not been off for a while. Hit from behind with a mallet, but try to bring it off squarely. Once the disc is removed, undo the bottom anti-roll bar bolt and slacken the top one to allow the link to rotate out of the way. Remove the ABS sensor
(8mm socket), and tie it out of the way. |
|
 |
|
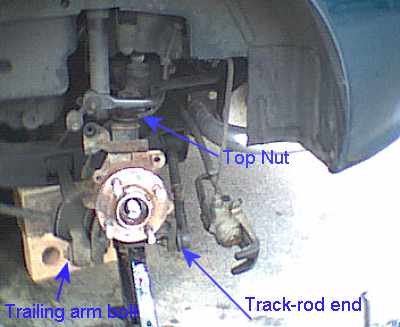
| Raise
the hub assembly slightly using the jack, in order to take the strain
off the lower attachment points. Remove the nut on the track-rod end,
and hit the end of the stud with a mallet to knock the tapered shaft out
from the housing. (Using a hammer may damage the threads) Remove
the trailing-arm bolt. This is tight all the way off as it's Loctited
in. |
|
 Oh, Oh, again the bricks ;) |
|
| Lower the jack, and undo the top nut. There's a tab washer which will need flattening down before you can undo it. Once the nut has been removed, hit the top of the stud with the mallet, the shaft is tapered again, and the whole housing should then drop. Slide the housing off the end of the splined drive shaft. | |
 Hub
Assembly removed. Hub
Assembly removed. |
|
| Hub
assembly. 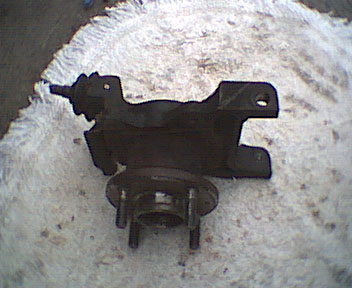 [NOTICE This is an old clout and not K's current bathromm carpet] ;) |
|
| You will
then need to use a large press, to press the hub out of the bearing from
behind, and then press the bearing out of the housing. Be sure to remove
the two bearing retaining clips from the housing before trying to press
the bearing out! Press the new bearing into the housing, fit the retaining clips, and then press the hub into the bearing. As always, refitting
is a reverse of removal! Good
luck.
Zuerst oben und
unten anpacken und rütteln Wenn es da nicht klappert,
dann ebenso heftig rechts und links das Rad packen und 'waagerecht'
rütteln. Wenn's immer klappert, dann ggf. Radlager, oder alles vorgenannte defekt. |
|
| © 2002 - 2009 Dieter Koennecke |
   |
||||