Coolant mix ???
Early vehicles up to VIN No: 512771 use
UNIPART Superplus 3 Anti-freeze and Summer Coolant GEC1020 - 20
litre and GEC 1002 2 litre
to protect the cooling system. The coolant is yellow/green in colour.
CAUTION: No other ’universal’ or Organic Acid Technology
(OAT) anti-freeze should
be used with UNIPART Superplus 3 Anti-freeze and Summer Coolant. If UNIPART
Superplus 3 Anti-freeze and Summer Coolant is not available, use an ethylene
glycol
based anti-freeze containing no methanol with non-phosphate corrosion
inhibitors which meet
specifications BS6580 and BS5117 suitable for use in mixed metal engines.
To ensure the protection of the cooling system against corrosion, these
anti-freezes must be renewed every 12 months.
Vehicles from VIN No: 512772 to Vin No: 520012 use
UNIPART AFC Longlife Anti-freeze and Summer Coolant AFC GEC6025
(25 litres)
to protect the cooling system. The coolant is blue in colour.
CAUTION: No other ’universal’ or Organic Acid Technology
(OAT) anti-freeze should
be used with UNIPART AFC Longlife Anti-freeze and Summer Coolant. If UNIPART
AFC Longlife Anti-freeze and Summer Coolant is not available, use an ethylene
glycol based anti-freeze containing no methanol with non-phosphate corrosion
inhibitors which meet specifications BS6580 and BS5117 suitable for use
in mixed metal engines. To ensure the protection of the cooling system
against corrosion, these anti-freezes must be renewed every 12 months.
Organic Acid Technology (OAT) anti-freeze GEC5025 (25 litre)
Vehicles from Vin No: 520013 use Unipart OAT (XLC) coolant which
is Orange/Pink in colour. Vehicles using OAT anti-freeze are identified
by a label attached around the expansion tank filler neck
CAUTION: The anti-freeze used in the cooling systems of later cars
contains
OAT corrosion inhibitors. This anti-freeze must not be used with any other
anti-freeze and
must not be used as a replacement in cooling systems which previously
contained anti-freeze
not of this type. Use UNIPART OAT Anti-freeze and Summer Coolant or any
ethylene glycol based anti-freeze (containing no methanol) with only OAT
corrosion inhibitors, to protect the cooling system. Only anti-freeze
containing OAT corrosion inhibitors should be used. Do not top-up or refill
cooling system with any other type of anti-freeze.
In an emergency, if anti-freeze to this specification is not available,
top-up the cooling
system with clean water only, but be aware of the resultant reduction
in frost protection. The
correct anti-freeze concentration must be restored as soon as possible.
For future servicing convenience, it may be desirable to update the specified
coolant in an earlier vehicle by replacing it with Unipart OAT (XLC).
This is permissible, provided that the cooling system is first drained
and flushed at low pressure.
When Unipart OAT (XLC) coolant has been added to such a vehicle, it will
be necessary to replace the existing black filler neck label with the
OAT warning label (part No: PAK100410A), to indicate the coolant specification
has been changed.
All vehicles
The cooling system should be drained, flushed and refilled with the correct
amount of anti-freeze
solution at the intervals given on the Service Maintenance Check Sheet.
After filling with anti-freeze solution, attach a warning label to a prominent
position on the vehicle stating the type of anti-freeze contained in the
cooling system to ensure that the correct type is used for topping-up.
The recommended quantitiy of anti-freeze is:
Solution 50%, Amount of anti-freeze 5.25Litre
Since anti-freeze contains highly toxic chemicals it is important to remember
safety and clean up procedures if any is spilled. A cleaning service isn't
required to clean up any spills since all you need to do is pour kitty
litter, sand or another absorbent material over the spill, then after
an hour you can simply sweep up and dispose of it in a trash bag.
Ethylene glycol with
inhibitors
GLYSANTIN
® PROTECT ENGINE COOLANT CONCENTRATE
GLYSANTIN
® G 48 ENGINE COOLANT CONCENTRATE, BLUE-GREEN
COLOURED
GLYSANTIN
® PROTECT PLUS ENGINE COOLANT CONCENTRATE, BLUE-GREEN
COLOURED
Mono ethylene glycol with inhibitors
GLYSANTIN
® ALU PROTECT PREMIUM ENGINE COOLANT CONCENTRATE,
MAGENTA COLOURED
GLYSANTIN
® G 30 ENGINE COOLANT CONCENTRATE, RED
COLOURED
GLYSANTIN
® G 33 ENGINE COOLANT CONCENTRATE
GLYSANTIN
® G 34 ENGINE COOLANT CONCENTRATE
GLYSANTIN
® G 05 ENGINE COOLANT CONCENTRATE, YELLOW
COLOURED
VALVOLINE
ZEREX Ethylene Glycol, OAT (organic acid technology)
ZEREX ExtremeLife Orange coloured
Ethylene Glycol, HOAT (hybrid organic acid technology)
ZEREX G-05 YELLOW COLOURED
http://www.englefieldoil.com/PDF/Zerex_chart.pdf
Ob Du G11 (blaue od. grüne
Farbe, silikathaltig) oder G12 (rote Brühe, silikatfrei) brauchst,
es kommt darauf an, was drin ist..
G11 und G12 nicht mischen, sonst kann die Kühlflüssigkeit
aufschäumen und die Kühlung des Motors ist gefährdet.
Wobei G11 ist bei VW durch G12 Plus ersetzt worden.
Nehmen würde ich eins (das für den Motor richtige => Betriebsanleitung)
v. BASF (Glysantin). Diese gehören zu den Besten am Markt. Die silikatfreien
(roten) brauchen lt. VW gar nicht gewechselt werden. Die silikathaltigen
(blau-grünen) würde ich alle drei bis vier Jahre wechseln (nicht
der Frostschutz, sondern der Korrosionsschutz läßt mit der
Zeit nach).
Zum Nachfüllen nicht nur Wasser o. Mittel nehmen, sondern mir dafür
in einem geeigneten Gefäß eine Mischung machen. Optimal ist
50/50. Also zur Hälfte Wasser u. Mittel.
Das "Protect
Plus/G48" von BASF ist ein blau-grün eingefärbtes silikathaltiges
Zeug (VW G11).
Das neue "Alu Protect Premium/G30" ist ein rotes
(genau ist es aber violett) silikat-FREIES.
GLYSANTIN Alu Protect/G30 silikatfrei

Ist das welches man sowohl mit anderen silikatfreien mischen kann.
Bei VW heißt diese Brühe G12 Plus!
(Quelle: z. T. "Sterndoktor")
G12 red, I think it reffers to OAT for MGR
A new "G12" coolant additive, recognized by its red color, has been introduced during m.y. 1997, replacing the "G11" used previously.
The "G11" and "G12" coolant additives are NOT interchangeable, and must NEVER be mixed. Use only water or "G12" coolant additive G 012 A8D A1 to top up cooling systems filled with "G12."
GLYSANTIN Alu Protect/G30 silikatfrei
Contamination of "G12" with other coolants can be identified by discoloration (brown, purple, etc.), and foamy deposits in the radiator or expansion tank. If contaminated, the system must be drained and flushed immediately.
"G12" (Part No. G 012 A8D A1) may also be used in older vehicles, but only if the cooling system is drained and flushed as described
below.
How it gets first filled at the factory. Spotted by a good friend while a factory visit at Longbridge
They do it to attach a device
to the expansion tank which sucks all the air out of the system.
They then put in a measured amount of coolant which is sucked into all
the corners of the system with no air pockets. Easy-peasy, and no spills
or mess.
So done by applying vacuum. Pressure not proved currently.
Normally a vacuum equipment is not availiable. So see the following instructions for DIY filling
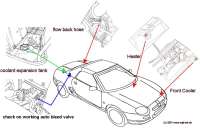
The MGF has a difficult procedure
which must be followed. There are three bleed screws which must be opened
until coolant flows freely with no bubbles. Most importantly the filling
and bleeding should take place with the heater set to fully hot.
At last it is vital to check the auto bleed valve wether it sticks. See
the description far below.
Further the vehicle should be driven for a short while to release any
trapped air and re-bled.
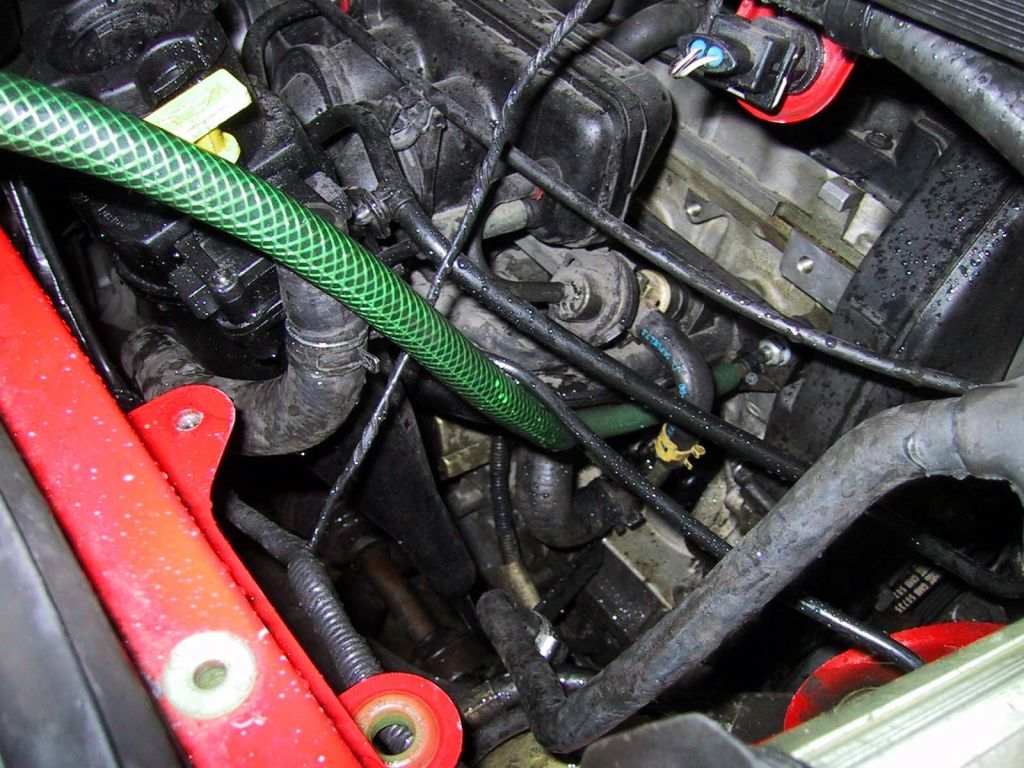
 A
A  B
B 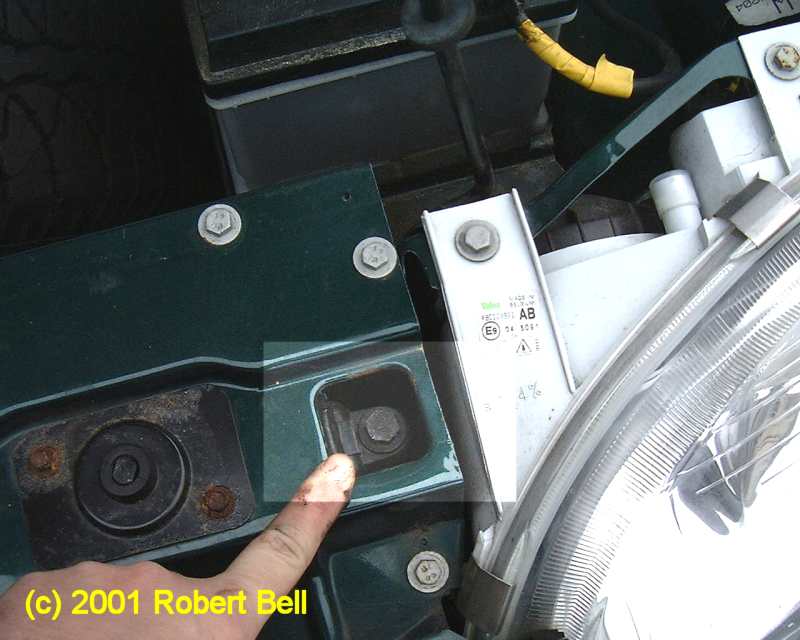 C
C 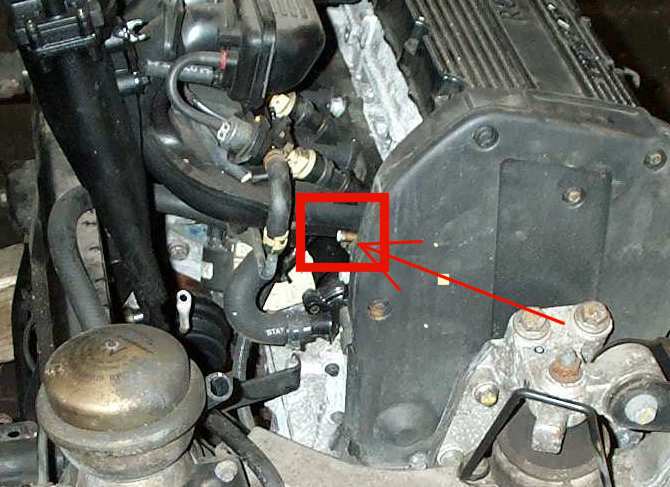 NOTICE: THIS BLEED ACCESS (D)
IS CURRENTLY NOT WRITTEN TO THE WORKSHOP MANUAL (EDITION 7) BUT SHOULD
BE INCLUDED IN LATER EDITIONS !!
NOTICE: THIS BLEED ACCESS (D)
IS CURRENTLY NOT WRITTEN TO THE WORKSHOP MANUAL (EDITION 7) BUT SHOULD
BE INCLUDED IN LATER EDITIONS !!
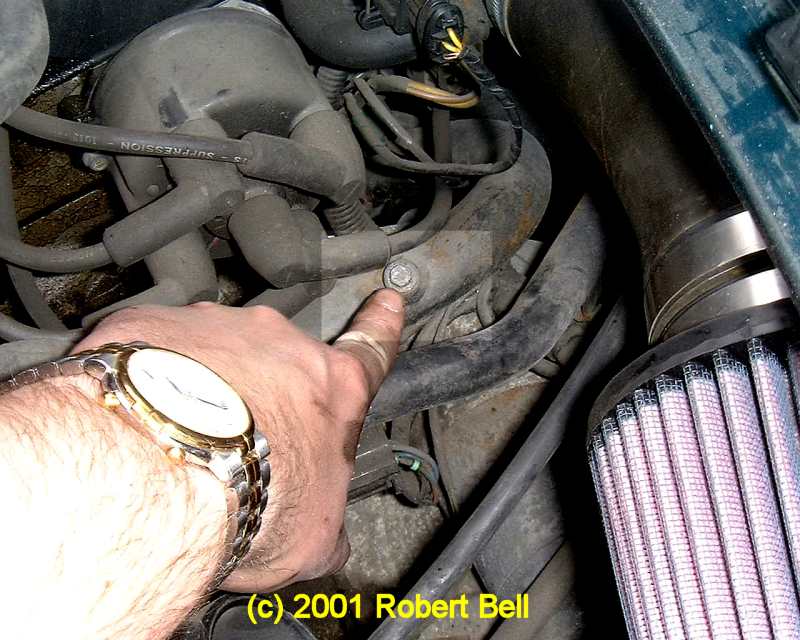
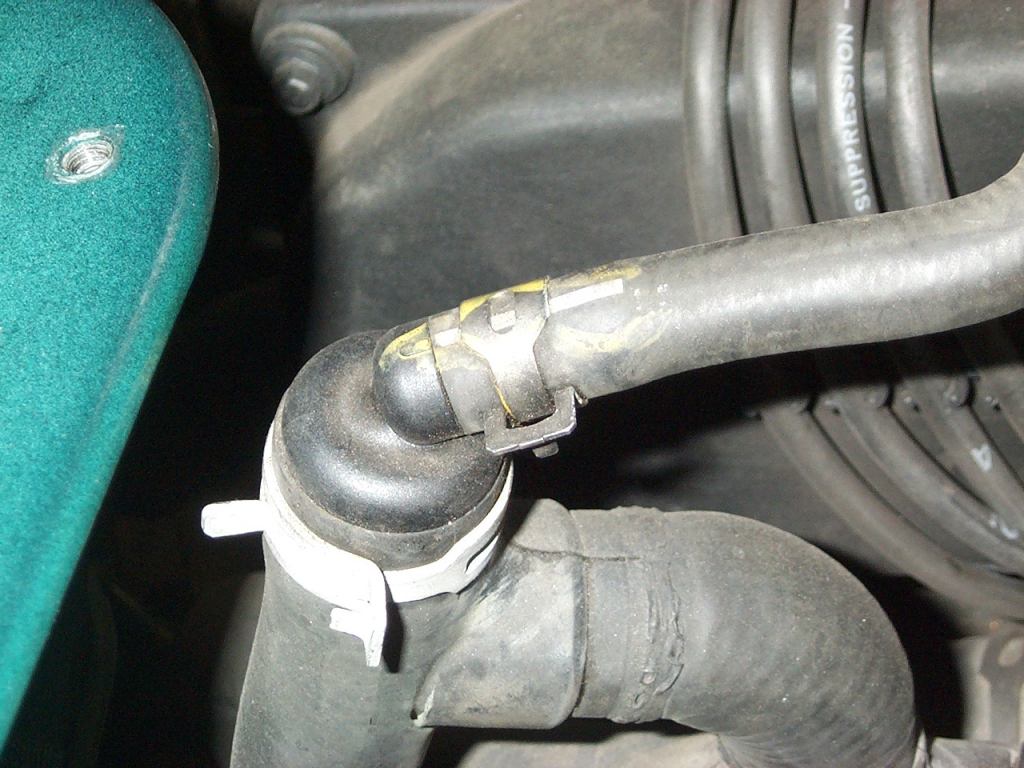
Auto bleed valve (jiggle valve) blocked ?
4th bleed location. The red box shows the location where the thin
short hose from the expansion tank was clamped with a jubilee clamp.
This is situated in the inlet manifold coolant stub pipe - manifold to
expansion tank on the right side behind the oil dipstick assy) . The idea
is that the valve will be open to the passage of air but that water will
lift the valve and close it. Blockage of this will not only hinder bleeding
following previous coolant drain down, but also allow air pocket build
up during future use. This may be from small pockets of air or bubbles
clinging to the coolant jacket surfaces that will migrate during running.
There may also be slight combustion gas leak (having passed the head gasket
fire ring). The bleed valve is not available as a separate item, but is
a simple device similar to the "Jiggle" valve often seen in
thermostats. The only way to ensure that it is clear is to remove the
manifold and flush through the stub pipe. At the same time ensure that
the short hose from here to the expansion tank is also not blocked or
kinked.
(Terry Cox, at the MG Cars BBS HGF
Causes)
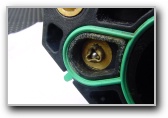
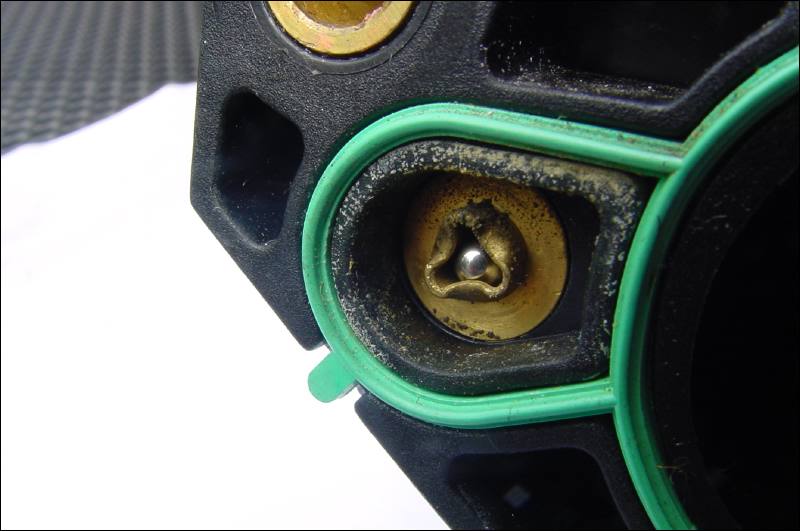
(bleed location D) from top.
The hose to the expansion tank is already removed. Also the oil dipstick assy is swapped to the left.
(Picture from a disassembled 1.8i engine)

The stub RH at an MPi inlet manifold / the jiggle valve at the other end of the stub
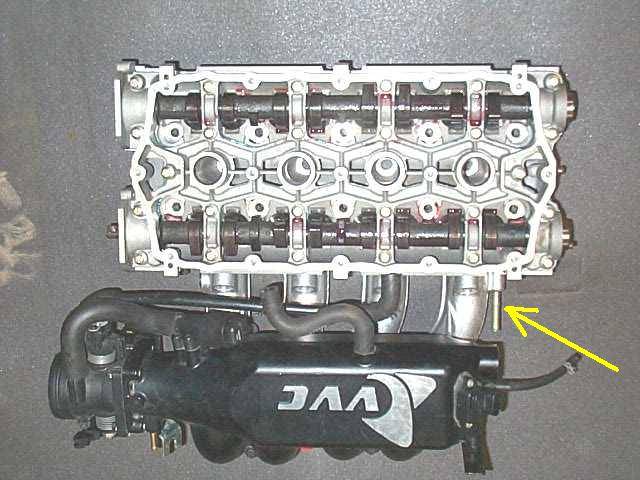 VVC
VVC © Roger Parker
Thread: Coolant - auto air
bleed check.
Posted 23 April 2001 at 23:34:12 UK time
Roger Parker, Tamworth,
In addition to the three manually opened bleed points on the cooling system
(water rail, heater and radiator) I think a timely reminder is of use
to introduce a periodic test by owners to ensure the little jiggle valve
in the inlet manifold of all MGF engines remains free and so allows air
circulated up in the engine to automatically escape to the header tank.
Both plastic and alloy manifolds have a small bore hose that connects to a stub at the cam belt end of the manifold flange. This valve consists of nothing more than a plastic ball which is heavier than air and lighter than water. When the cooling system has no air this ball is held on a seat and so closes the path for coolant to the header tank from this direction. If any air percolates to the top of the engine, which it will if any is there, then the ball falls away from the seat and the air escapes to the header tank. As soon as coolant arrives the ball reseats.
It has become more and more apparent as cars age that this valve sticks on it's seat and so any air remains trapped in the upper part of the engine. This as we all know can cause spot overheating and even cause interuption to coolant flow and the results can be ....... unpleasant and costly!!!
A simple check periodically can ensure that the valve remains working properly. This involves removing the existing hose and I suggest it be squeezed with a brake pipe clamp or other similar device to prevent unnecessary coolant loss. Then have to hand a length of the same bore hose that can be simply pushed onto the manifold stub and long enough for you to be able to blow into it.
If the valve is free then you will be able to blow past the valve. If it is stuck then you won't be able to blow into the system. Loosening the valve involves removing you blow hose and poking a blunt probe down the manifold stub to dislodge the ball. Check again by blowing down to confirm it is now clear. Remember that the valve will stop any coolant loss so you only have to worry about the hose from the header tank.
Removing and carrying out this will not lose any coolant, other than a few drips and confirms that a safety valve to help prevent HGF is actually working.
Rog
Kes hints on how to find
out whether a dealership will know about what to do. Written to the BBS
on April, 16th 2001
You will need a little tact with the mechanic, as none of us likes to
be told how to do our job. Try to lead him with friendly questions. I
suggest these:
How do you drain the system,
then? (get him to do the talking)
Do you disconnect both the underfloor hoses when draining the coolant?
(essential for complete draining)
Do you open the bleed points when draining? (ditto. The return pipe especially
will be reluctant to drain when the thermostat is closed (as it will be)
as it will then be a 'blind' pipe)
I should also make sure the heater control valve is on Hot when you take the car in.
The F should be relatively easy to refill, there are no unvented loops as there are on the front engine installation. I believe the coolant change problems come from having undrained slugs of coolant left in the pipework, which trap pockets of air and prevent circulation. I also think that the bypass and breather hoses don't help (and I could go on at length about them), but we can't do much about them.
If you aren't too far from the dealer then drive home at a moderate speed and put the car up at the front on ramps, or jack it up as far as is safe. Have your dinner/beer or amuse yourself for an hour or so. Then try the radiator bleed point. Drop the car and try the return pipe bleed point. I wouldn't be so worried about the heater circuit but do that sometime. Top up if necessary.
I don't really know what else to recommend........ I hope it helps and makes sense.
Regards, Kes.
At last the experiance
of Jon Fredheim, Norway. (professional Mechanic)
After having a HGF he found a lot of oil in the coolant system and immidiately
suggests to carefully clean it from oil before refilling the new coolant
mixture !!:
Two times i have flushed the system and added a chemical that i purpose
made for cleaning cooling system for oil. Each time the water I drained
was very dirty. The first time a lot of not dissolved oil also came out.
Tomorrow I'll drive a trip with just clean water in the system, then I'll
drain it and replace it with water again.
Did I mention how easy it is to bleed the system filling it with a water
hose through the manifold bleed nipple?
With clean water in the system I jack up the rear of the car and fill
five litres of fresh antifreeze through the expansion tank while draining
water from the radiator.
Hi Mick
I had the cap on when I ran my car for the first time after bleeding my system...seemed to work fine. i think there should not be much air in your system if it is properly bled.
I had a very easy time bleeding my system last week after fitting new coolant pipes.
This is what i did and all went very smoothly
1- take a look at the "Jiggle valve" as mentioned on this web site http://www.mgfcar.de/bleed/index.htm
2- make sure the heater is switched to full on
3- open all the bleed points fully
4- ask 1 person fill the coolant bottle and another person watch the radiator bleed point till no air bubbles can be seen. Retighten the bleeder bolt, I used a clean oil tray to catch the excessive coolant.
5- attach a clear tube to the heater bleeder nipple (the same as if you were bleeding brakes) and open. If you dont get any flow remove the bleeder nipple and make sure it is not blocked by blowing on it with your mouth. If this is not blocked and you are not getting any flow, poke a blunt object into the bleeder nipple hole and move it about. The hole it self could be blocked but be prepeared to re-insert the heater bleeder nipple quickly. Keep your friend topping up the bottle and wait till you can see no air in the clear tube. re tighten the nipple
6- 3/4 fill the cooant bottle and repace the cap. Run the car till the front fans come on and switch off the engine (half an hour or longer)
7- wait a while (have a beer)
8- open the bleeder screw on the radiator return pipe (in the engine bay) and bleed. I admit i did this whilst the car was still warm but not hot and no coolant came out. My friend then opened the coolant bottle cap and out flowed the coolant with no bubbles so i quicky tightened the last bleeder screw and the job was completed.
Good luck
I read the instructions on this web site and was amazed how easy it was.
http://www.apttony.co.uk/
--------------------------------------------------------------------------------
From: j watson Essex United Kingdom on 09 April 2004 at 18:03:41 (UK
time)
thanx for all the info
i did my pipes today and all seems to have gone well, however i did have
find the heater bleed nipple was blocked and i had to remove the nipple
completely and have a little poke about,as you say ,you have to be quick
getting it back in.i also had a look at the jiggle valve but it seemed
to operate ok.i have just been out to top it up again(only about half
a pint)but i will keep an eye on it for a few days, there doesnt appear
to be any leaks and the fans coming on ok. so fingers crossed.
thanks again
Elise Coolant System, different to the MGF !!! The Elise heater circuit flow runs constant and it is controlled by air flaps. & look at David Monks setup
At the MGF this circuit is
controlled by the heater valves.
MGF coolant system
Copyright of MG Cars Enthusiasts' Club Limited
Since 2005 a coolant level sensor is installed at the MGTF
LOW LEVEL SENSOR
Price: 8.17 + 1.43 VAT = £ 9.60 each
Part No: PCJ000040
EXPANSION TANK 632424 >
Price: 18.32 + 3.21 VAT = £ 21.53 each
Part No: PCF000140
Entlüften, die kurze Variante nach Kühlmittelwechsel (ohne Prüfung des Rückschlagventils)
- Vorne aufmachen.
- Entlüftungsschraube am Kühler lokalisieren, und Entlüftungsschraube
am Heizungskühler lokalisieren (oben zwischen den Scheibenwischerarmen)
- Motordeckel hinten aufmachen, die unter der Hutablage
- das Ausdehnungsding hinten mit Wasser bis zur Maxmarke auffüllen.
- die Heizung (Das Ventil), den Knopf mit der rot-blauen Skale voll aufdrehen.
- Heizungsventilatorschalter auf Null stellen
- oben zwischen den Scheibenwischerarmen die Entlüftungsschraube
aufdrehen bis was *blasenfrei* was rausläuft.
- Wieder zudrehen (handfest)
- die leicht von selbst zerbrechende Entlüftungsschaube am Kühler
losdrehen, und lösen bis blasenfrei Wasser rausläuft.
- HANDFEST zudrehen (nach fest kommt ab)
- im Motorraum hinter dem Luftfilter die Enlüftungsschraube lösen
... Wasser kommt blasenfrei; zudrehen.
- Wasserstand im Behälter checken;
- nachfüllen bis max Marke, und Deckel drauf am Ausgleichsbehälter.
- Motor anlassen und nur im Leerlauf, ohne Gas laufen lassen.
Tasse Kaffee trinken
gehen (5 Minuten Pause)
- Bei laufendem Motor nun das warme System nochmal in identischer Sequenz
entlüften. (oben, vorn, hinten)
- Am Ausgleichsbehälter gucken ob noch genug drin ist.
- Motor weiter laufen lassen bis vorn der Lüfter anspringt (nach
in Summe etwa 30-45 Minuten)
- nochmal oben, mitte, hinten kurz entlüften und fertig ist die Kiste.
Die Entlüftungsschrauben hinten und am Heizungskühler anziehen ( ?? Nm) und die Dichtigkeit der Frontkühlerschraube checken.
Zur Sicherheit kauf
Dir die Frontkühlerschraube vorher, weil die ggf. eh kaputt gehen
wird.
PYP100500 - Screw -bleed plastic (thread M12x1,25 )
Achtung neue Alu-Kühler haben einen M10x1,5 Verschluss