Dieters MGF Homepage: please sign my Guestbook if you enjoy this instruction.
Electric Boot Lid Release for MGF zur
deutschsprachigen Version
The high price for this useful but not vital MGF
feature did´nt let me rest. After intensive global research I found the
right Solenoid at a german distributor. I think, that this Modul could be availiable
in the far east for a more cheap price.
The great friendship to other F-Enthusiasts and constant help of one to each
other on all question to this lovely roadster have veranlaßt diese Anleitung
all F-Enthusiasts to their peronal use.
I agree with Weitergabe in unveränderter Form but I exclude any commercial
use. Your are responsible yourself for possible damages in each case .
Function
At the rear Boot slot ist ein Haken parallel to the existing
schwarzen pull-lever eingehängt. This Haken wird mit a Solenoid over a
flexible Bowdenzug mittels push button moved and acts the slots bracket,
only if:
- the ignition slot is in position I, ´"Parking"
, or
- the ignition is activated and the hand brake level is pulled
The boot lid could not be released while riding.
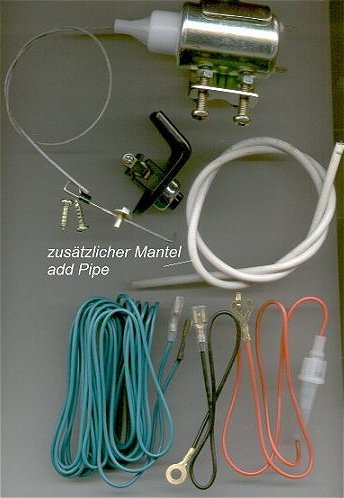
Parts List
| where to get | how much | |
|
| Solenoid Set Part No. | http://www.carguard.de | 40 EUR+ p+p | |
| 1. solenoid with bracket | included | ||
| 2. pushbotton with bracket | included | ||
| 3. green wire (switched +) | included | ||
| 4. black wire (ground) | included | ||
| 5. red wire with fuse (+) | included | ||
| 6. 2 thread screws | included | ||
| 2 metal driven srews (alternativ) | included | ||
| 7. release bracket with clamp | included | ||
| wire tabs (app. 15 pcs) | supply shop | ||
| 6.3 mm faston car plugs (5pcs) | supply shop | ||
| supply relais 12 V 1x NO-contact | used car parts shop | 2,50 EUR | |
| Y-bypas connector (blue) | supply shop | ||
| 340mm flex-pipe of a bike brake-wire | bike shop | 1 EUR |
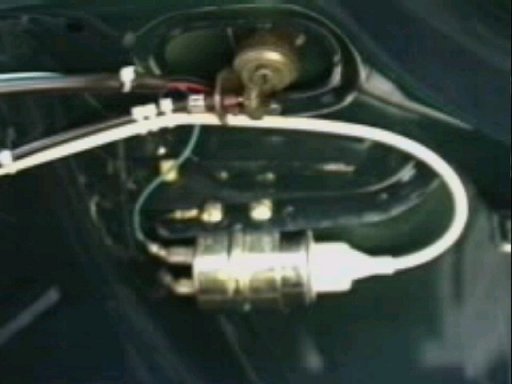
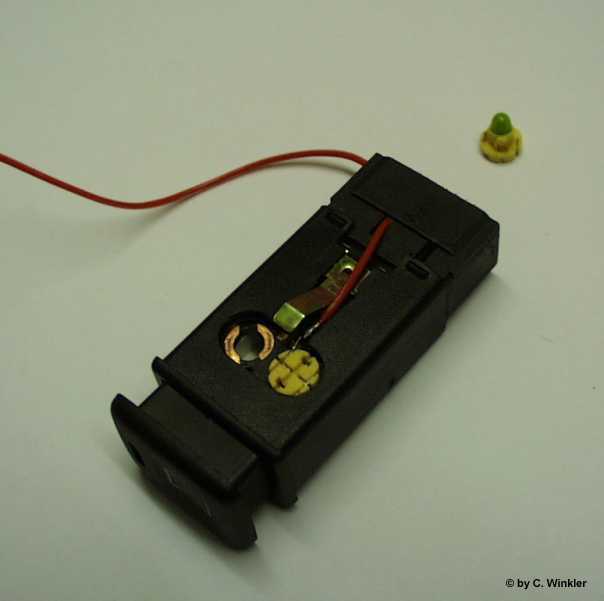
Picture 1 The Set (Bowdenzug-Pipe is not included!)
Pre work
pull wire straight when bent slip the flexible pipe on the wire. Pipe in white plastic cover fest press (turn it right while pushing)
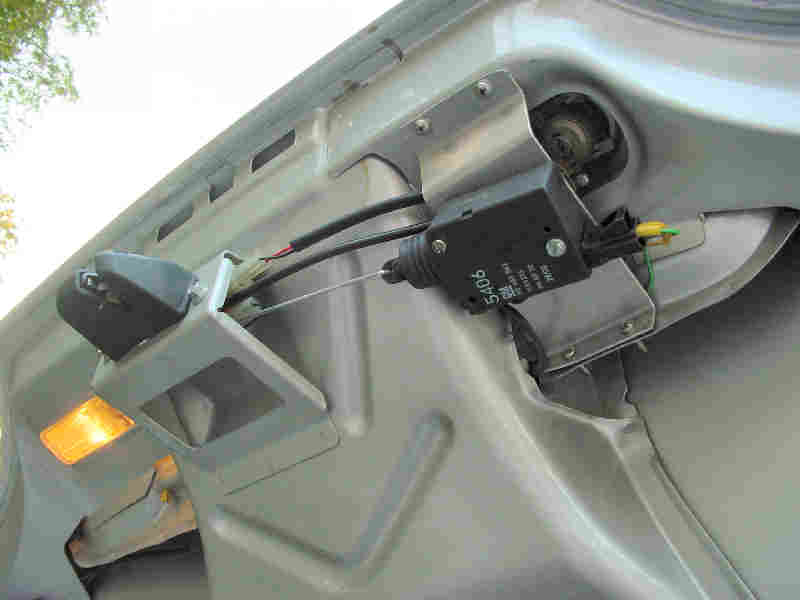
Fitting the Solenoid
The Solenoid-Bracket should be fastened at the Boot lid with two M6 screws .
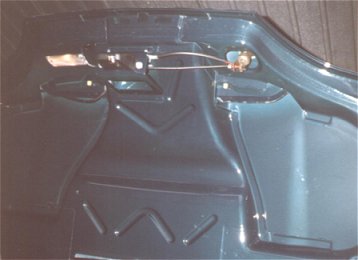
Picture 2 open boot lid picture 3 position of solenoid bracket
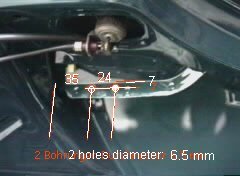
Distance of app. 35 to 40 mm to the nearby boarder of the slot box plate, so that if the solenoid is fixed die plugged connector produce no electrical shortcut. Hole distance 24 mm, app. 7 mm below the bended boarder. The screws heads need a little space to this border.
picture
4 two holes to drill picture
5 ready fitted and wired solenoid, wire taps
(fastening/adjusting the flex pipe see last step !)
2 holes to mark, körnen und drill, diameter 6,5 mm . pre drill with D =2mm.
Den Solenoid mit den 2 long M6 screws in den hold bracket clamp
in und die fasten the nuts with low torque towards the Solenoids bracket. Plug
the green and black wire to the solenoids contacts. Take care that the female
side is not pushed into the solenoid ! An die Befestigungsbohrungen halten und
so drehen und schieben, daß die connections don´t
contacte the plate , if required carefully bend the plugs. Then tighten the
long screws and screw the nuts against the bracket.
Screw the Solenoid with bracket at the boot lid and put
the grounds black wires Öse under the left screws head. Ggf Federscheiben unterlegen.
Fasten the pipe at first only with one or two wire ties
slightly to the existing black wire pipe, because it must be adjusted at the
last step of the fitting again
Prepare the Haken Clamp
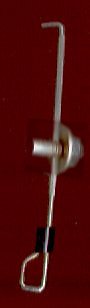 The
Betätigungshaken wird in die Schloßhebel-Öse an der Stelle eingehängt, wo der
vh. Bowdenzug diesen lever mit der ball betätigt. So wird das slot can be acted
either by the key or electral by the solenoid.
The
Betätigungshaken wird in die Schloßhebel-Öse an der Stelle eingehängt, wo der
vh. Bowdenzug diesen lever mit der ball betätigt. So wird das slot can be acted
either by the key or electral by the solenoid.
Die Einhänge-Öse des beigefügten Hakens ist zu eng dazu und
der Schloßhebel ist so hard, dass man keine Nute einfeilen kann. Daher muß die
Öse des Zughakens weiter aufgebogen werden. Den small black pipe dazu vorher
hochschieben.
( Wenn eine kleine Trennscheibe verfügbar ist, dann sollte man damit eine Kerbe
in den Schließhaken schleifen und den Haken nicht nachbiegen).
Den Haken in den Schloßhebel einhängen, dazu ggf. das Schloß demontieren und
nach innen kippen
Slot demontage, if required
Lift off the plastic enclosure carefully with a screwdriver and pull it off
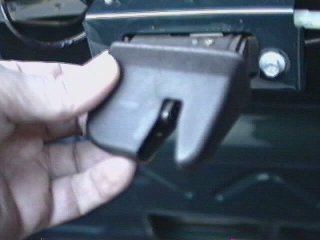
Picture 7 + 8
Sechskantschrauben herausnehmen. Push out the cabel ties right and links, pull off the large plug.
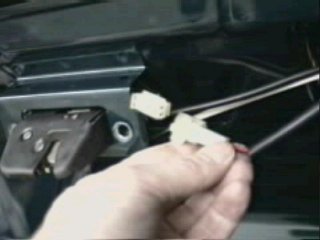
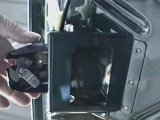
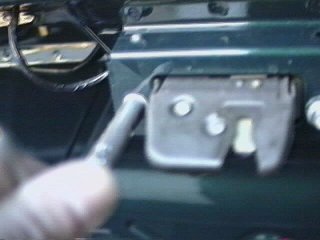
Abbildung 9 + 10
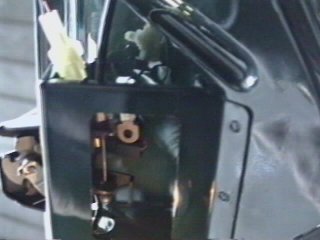
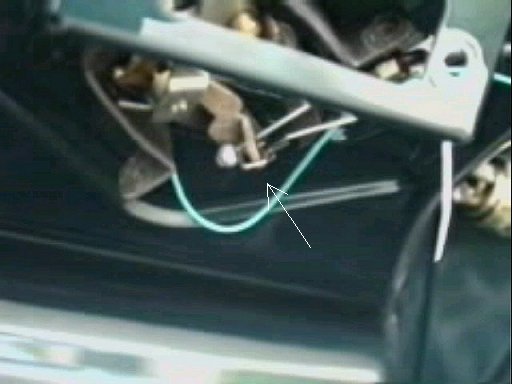
Abbildung 11 + 12
Etwa so muß der Haken liegen, wenn er in den Schloßhebel (Pfeil) eingehängt ist.
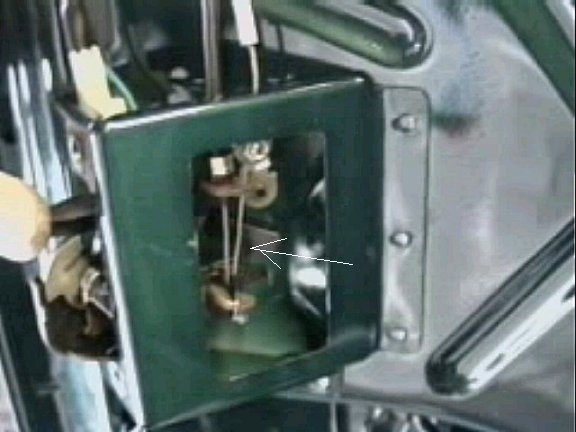
Abbildung 13
Hold the pull wire beside den abgeflachten Draht halten, und den Klemmbolzen mit Scheibe und Mutter aufschieben. Das ist der schwierigste Teil des Ganzen !
Die clamp screw should lie outside the slots area, also bis zum Ende schieben, damit die washer am abgewinkelten end anliegt. Nun die clamp screw nur leicht mit Steck-Schlüssel anziehen.
Adjustments:
The pull solenoid has a total working length of 15 mm. That
is far to much l, It is vital to use only the last app. 5mm of this way to prevent
distortions on the slot function.
You find this point, if you pull the wire until the end out of the solenoiden
and then push it back app. 10 mm. In this position the Solenoid can pull at
last ca. 5mm and just release the slot.
Diese Position ungefähr suchen und das Zugseil dann mit der Klemme fest anziehen.
Die exakte Einstellung wird durch Längsverschiebung und Festsetzen des Bowdenzugmantels
erreicht, aber dazu muß das Schloß jeweils wieder in die normale Lage zurückgeschoben
werden, wo es zum Schluß wieder angeschraubt wird. Der Klemmschraube wird der
kleine Stecker am Schloß im Wege sein ! diesen Stecker vorsichtig um ca. 30
Grad vom Betätigungshaken wegbiegen.
Fasten the Solenoid-Bowdenzug to the existing black Bowdenzug with several cabel ties.
Check the funktion repetierend for adjustment electrical ! You find a Plus wire for the Impulsgabe at the boot illumination lights contacts.
Dazu die boot illumination carefully demontieren (Die Rasthaken break off easy) und das green wire kurz am rear light contact. If ther Solenoid acts to the wrong direction, then change the blake and green wire at the solenoid.
Schloß wieder einbauen und Funktion mit Schlüssel und/oder elektrisch (grünes Pluskabel) mehrfach prüfen. Festen Sitz der Kabelbinder und Schrauben checken.
wiring to the fuse board
lead the green wire from the slot through the lid down to the existing wire durchführung:
Leuchte herausnehmen, falls nicht bereits
erfolgt.
Unterer Kabeldurchführung aus der Haube herausholen.
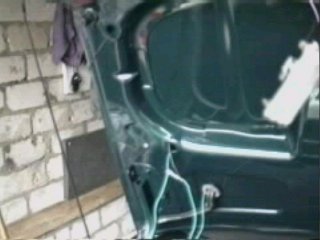
Abbildung 14
Eine ca. 50cm langen, festen Draht jeweils von Loch zu Loch führen, grünes Kabel daran befestigen und durch die Haube bis nach unten häkeln. Am Kabelstrang entlang durch die vh. Durchführung schieben (ggf. Mit Schraubendreher etwas aufhebeln.
Motorraumgitter aushaken, erst vorn, dann die Bolzen hinten aus den Buchsen heben. (ohne Abb.)
Picture 15 +16
Open the Softtop-clamps and open it at the rear side. Remove the carpet and find the oval Rubber (Abb.16) für den Kabelschacht rauspulen.
So Nicht ! (pic. 16) Da hat my MGFs pre owner cut a large hole for his CD-change modul !
Kabel mit langen Fingern neben dem Motor in das
Langloch einführen und in der Hutablage durch das Langloch
wieder heraus (Abb16) in. Das Gummiteil mit einer Ahle ein Loch
reinpopeln und Kabel durchstecken.
Das grüne Kabel längs des Weges mit Isolierband oder
Kabelbindern an Kabelbaum sichern.
lead wire to the fuse board
Down along at the door along the carpet (loosen the sticky tape),
if they still are adhered to the plate ;o).
Open the Fuse box (2x Bajonett key 90 grd turn).
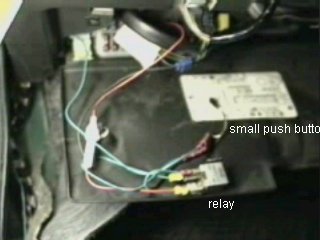
Electrical connection
Relay-Pins:
30: and 85:
crimp a wire bridge and connect to the set included red wire with the Fuse .
86: crimp and connect a app. 20 cm long wire (Brown coloured for example)
87: connect to Pin 1 of the included push button.
Fuse board:
On the left side top are two wide multi contact plugs, from
the lower one search for the wire whitch is black and white coloured.
( This wire is the leads to the hand brakes contact and to the indication lamp
of the handbrake.!)
Ggf. Überprüfen: Stecknadel durch das Kabel pieksen und diese Punkt mit dem Pluspol verbinden (von Steckanschluß #5 rechts von Nr. 3) Nun müßte die Handbrems-Kontrolleuchte rot aufleuchten !
An dieses balck-white wire kommt der Relay contact 86 (Spule) Anklemmen mit einem Y-bypass connector.
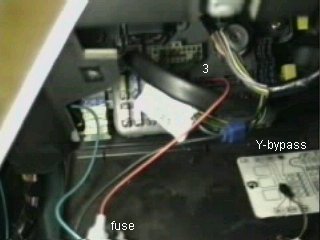
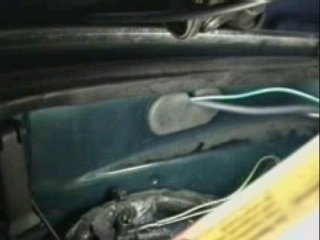
Abbildung 17
Mittig auf dem Sicherungsfeld sind drei graue Rahmen mit Flachsteckanschlüssen zu finden. Die Nummer 3 (drei) ist ein vom Zündschloß geschalteter Pluspol.
Hier wird die andere Seite der fliegenden Sicherung (rotes Kabel, vh Stecker abkneifen, Flachstecker ankrimpen) aufgesteckt.
ins Bedienpanel.setzt man an einen freien Platz den zusätzlichen
Taster
für Heckscheibenheizung, mit 2K-Lack so retuschieren, daß nur noch
ein Rahmen sichtbar ist
Picture 18 + 19
Nun nur noch das grüne Kabel an den Pol 2 des Taster anschließen Den Taster an gewünschte Position montieren, z. B. in den Instrumenten-Rahmen.oder hinter die Bleistift-Ablage
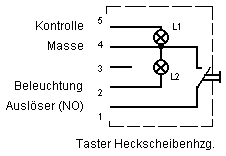
Or as nice solution of Peter S.:
Buy a 2. rear screen heater-pushbutton and mount it to a free field in the Switch
panel. change the symbol with black colour to only a box.
The wiring of this switch is: 1 = NO to the relais, 2 = Illumination, 4 = Ground,
5 can be used as indicator parallel to ther relais.
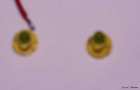
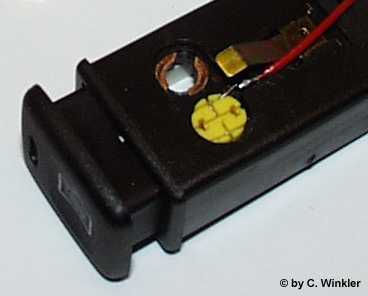
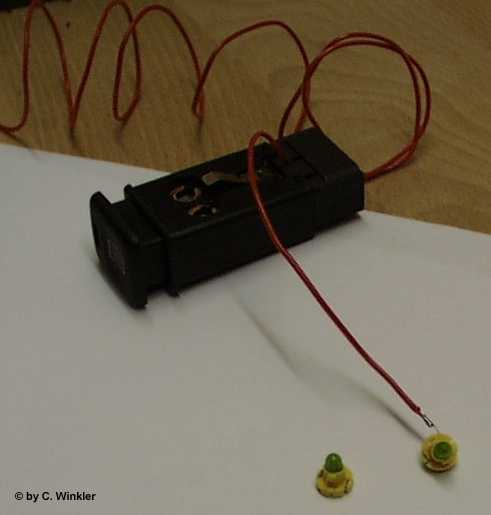
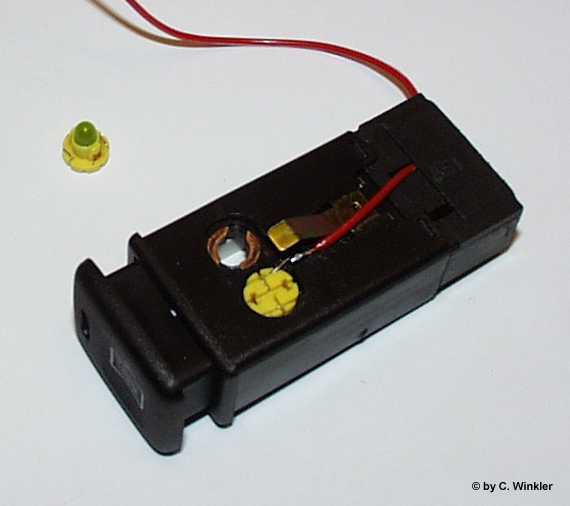
The following photos courtesy Cyril Winkler from Switzerland show the modification
of the heter switch for use of both lamps
 |
 |
 |
 |
 |
 |
 |
 |
 |
View on the redy assembled and adjusted Bowden pipe:
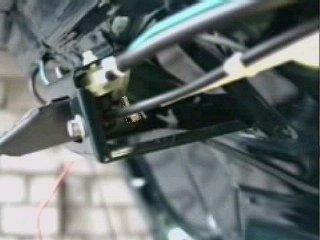
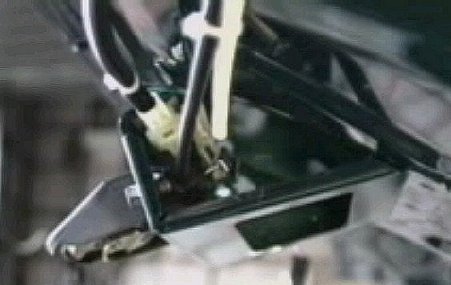
Picture 20 + 21 view on the mounted slot
Update 2005:
Habe das Magnetteil durch einen Opel Heckklappenschloss Öffner ersetzt.
Beim Kaufen darauf achten, das unter dem Gummischutz eine Druckfeder sitzt.
Die fehlte bei meinem, aber die Grabbelkiste gab eine her.
Release 0.5 D (Peter S. Tastentipp hinzu gefügt, 2. Anbieter
hinzu, Bilder von Cyril Winkler hinzu)
Copyright: 1999 - 2008 Dieter Koennecke.
Release2.0
Copyright: 1999 - 2008 Dieter Koennecke, Dormagen. pictures courtesy Cyril Winkler
back or to my MGF home site www.MGFcar.de
| © 1999 - 2009 Dieter Koennecke |
   |
||||